This week's homebrew adventure was to complete the receiver side of what I am now calling the KK4DAS MB 20 transceiver - MB is a call-out to Bill, N2CQR's Mythbuster rigs which this build is both inspried by and patterned after.
First order of business was choosig the IF freqency which was easy in this case. The VFO is at 9MHz so if I put the IF at 5MHz, well my 2nd grade math teacher taught me that 9+5=14 - which puts me right in the 20 meter band.
I ordered a batch of 5MHz crystals from Mouser for the IF but they had not come in yet - and I was impatient to get started so I built the BFO and balanced modulator using a crystal from the junkbox figuring I would swap in a 5MHz crystal when it arrived. The BFO and two diode balanced modulator is copied directly from Farhan, VU2ESE's original BITX20 schematic. It went together easily. Despite conventional wisdom I did not attempt to mach the diodes - I just took the first two off the tape.
BFO and balanced modulator
Nulling out the carrier
To null out the carrier I injected a 2MHz signal into the AF port of the modulator and put the scope on the IF port. Using the FFT mode of the scope I was able to clearly see the carrier and mixing products. I was able to effectively null out the carrier using the trimmer cap and trimmer pot that are part of the design. The two peaks either side of the middle are the first sum and difference mixing products. The display is centered on the carrier frequency and you can see that it has been nulled out.
The crystals arrived and the next job was to build the crystal filter. I used the Dishal crystal ladder filter design software to design a 6 pole Cohn/QER filter. The advantage of the Cohn filter is that it uses a single value of capacitor between each crystal. The QER (Quasi Quasi Equi Ripple) modification to the Cohn adds an addtional crystal in parallel at each end of the filter and reduces the amount of ripple. When building a filter the recommendation is to pick crystals fom your batch that are the closest in frequency to each other and the Dishal software requires you also to know the motional parameters for the crystal. I used what is called the G3UUR method to evaluate the crystals. I had previously built the simple crystal evaluation circuit and quickly sorted the crystals. I then used the Dishal software to determine first the motional parameters and then to calculate the capacitor values and input/output impedance of the filter. The calculated input and output impedance were spot on0and I calculate the LC values needed for matching to 50 ohms.
Sorting the crystals using the G3UUR circuit
The completed 5MHz, 2.5KHz filter
The last board I needed for the receiver was an audio amplifier. I opened up by box of "boards that could be rigs someday" and found an audio amplifier stage I had built for Pete, N6QW's SimpleSSB a few years ago. Its a single 2N3904 pre-amp followed by an LM-386. With all the boards needed for the receiver at hand it was time to connect everything up.
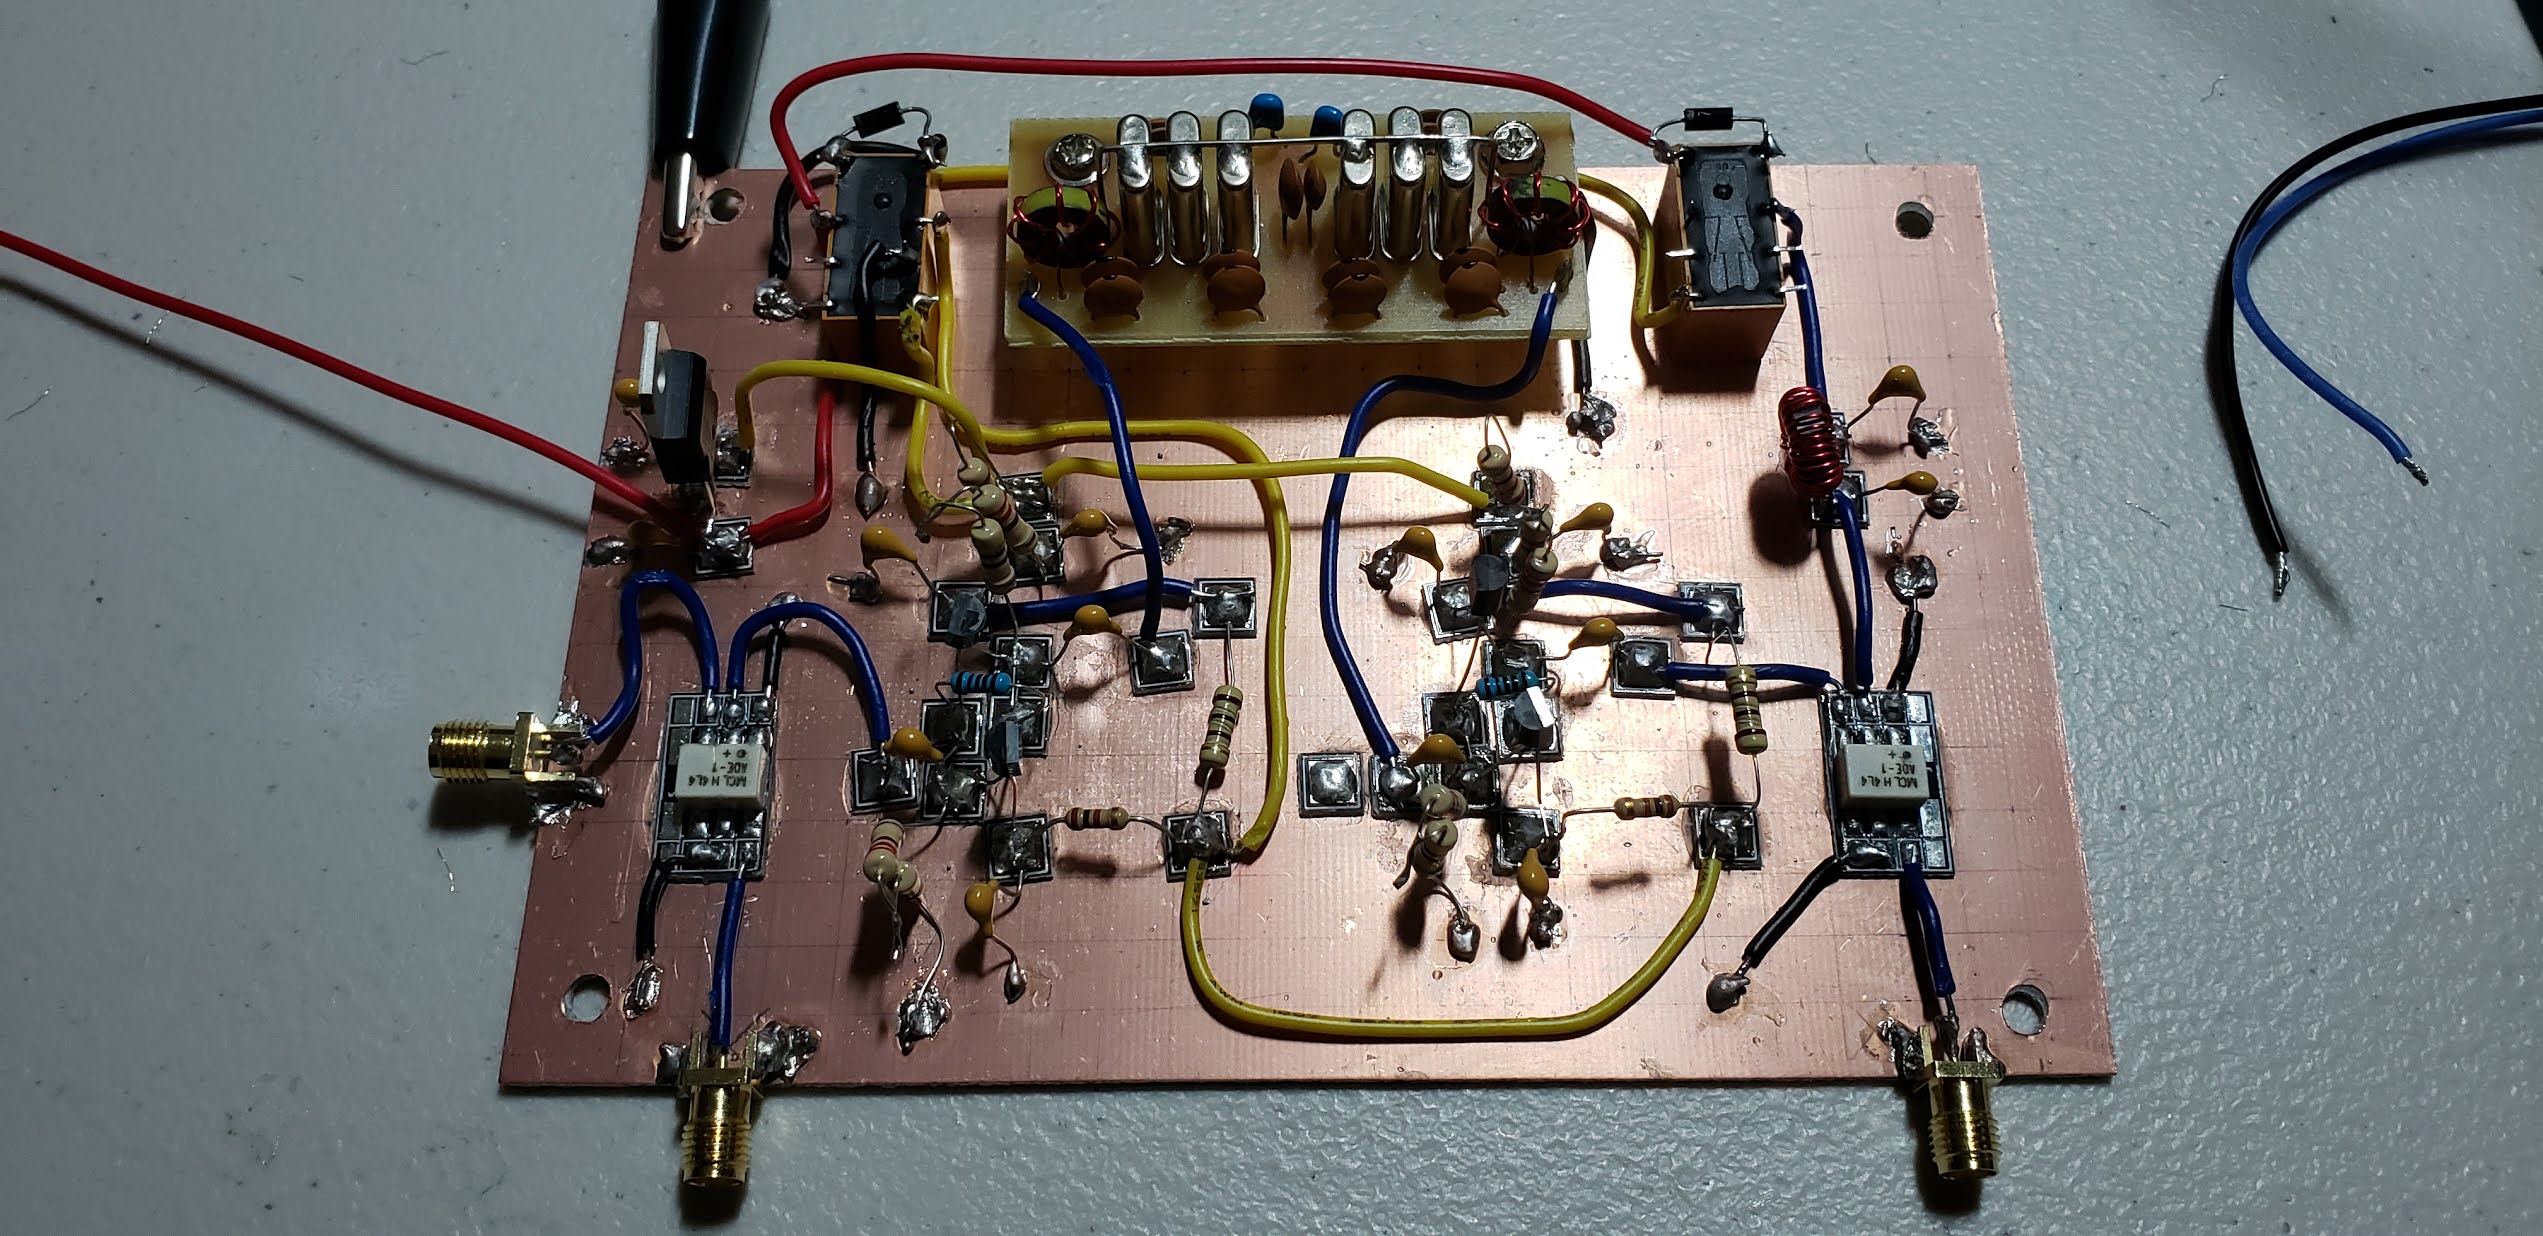
The completed KK4DAS MB 20 Receiver
I placed the crystal filter at the rear center with the MostlyDIYRF TIA IF amplifier boards on either side. I left space adjacent to the TIAs for the transmit IF amplifiers. The audio amplifier is on the lower right and just above that is the BFO / balanced modulator board. The receive band pass filter is on the upper left below the first IF amp. At the far left is the future Tx RF amplifier stage - not yet wired into the circuit. I mounted the antenna connector on a piece of single sided PCB. To keep the DC wiring straight I decided to use blue wire for DC on Rx and yellow wire for the DC on Tx. Red is used for always on DC.
A big advantage of modular construction is that since all of the modules have been tested individually it increases the liklihood that the build will work well when everything is connected. To my great pleasure that turned out to be the case and the receiver woked perfectly on first power up. There was one glitch - the tuner maxed out at 14.260 MHz about 100KHz short of covering the entire 20 meter band. I thought I was going to have to rebuild the IF with 5.2MHz crystals but Bill pointed out that Yaesu and built in a variable cap to move the VFO passband up or down. I zeroed out the capacitor and that gave me full coverage across 20 meters.
Adjusting the Yaesu VFO for full coverage on 20 meters
Now that the receiver is built I will spend a few nights following Farhan's advice and take pleasure in listening to the receive I have just built.
All I need to build for the transmitter is a microphone amplifier and the final low pass filter. Then add some relays for Tx/Rx switching and then I can work on fit and finish of the cabinet.
After spending months on Vienna Wireless Society Makers projects and the SolderSmoke Direct Conversion receiver project I wanted to get back to building a rig just for me! Several months ago Pete, N6QW sent me an ebay listing for a very nice Yaesu VFO module, for only $35. I jumped on it, not knowing what I was going to do with it. The module is complete with reduction drives and dials. It even came with the dial window that proclaims it to be from a Yaesu FT-401B.
Earlier versions of the VFO run on 6V but this one needs 9 to fire up and oscillate. After getting the voltage right it fires right up and tunes from about 9MHz to about 9.4MHz. So with a 5 MHz IF this will make a 20 meter SSB rig. Bill, N2CQR has built two of his Mythbuster rigs using this VFO module and I am following in his footsteps. Like Bill I found the output was too low to drive a 7dBm diode ring mixer so I build a 6dB gain Termination Insensitive Amplifier (TIA) to boost the drive to the required level.
I'm doing things deliberately this time around - I'm starting with the end-layout in mind including placement of all the modules. Its going to be in a homemade plywood case. I'm using copper plumbers tape to provide the ground plane and case shielding. After 5 years of continuous homebrewing I have built up a collections module boards that are just waiting for the right project come along. Bill calls these "boards that could be rigs." I already have the transmit chain built - it is two stages of 2N3866 drivers followed by a Mitsubishi RD16 MOSFET final - which should give me 10-15 wattts or more on 20 meters. This was the transmitt module I had built for my SBITX build before I went to a push-pull final for 25-30 watts. I have the diode ring mixer built (one of several build during the DCR projectg testing.) For the IF I have ordered 5MHz crystals from Mouser and am using 4 TIA boards that Todd, K7TFC of mostlyDIYRF kindly sent me some time ago. I assembed the TIA boards the other night. In addition to being termination insensitive which means that what you hang off the output doesn't load down the amplifier, they are also variable gain - anywhere from 7dB to 24dB by changing a three resistors. I had a 20 meter BPF built that was looking kind of ratty so I build a new one last night - I just used the component values from the QRPLabs BPF filter kit instructions. Tested on the NanoVNA less than 1dB of insertion loss and almost no ripple across the entire band.
20 Meter BPF - less than 1dB of inserstion loss acrosss 20 meters
20 meter SSB rig in progress VFO, buffer amp and diode ring mixer
VFO and mixer test - 14Mhz RF, 9Mhz VFO, products at 5MHz and 23MHz!
I have a couple of different ideas for the audio chain - I might use a kit (shocker) from Kitsandparts - as part of my ongoing desire to master surface mount construction. The balanced modulator will be a 2 diode version straight out of Solid State Design for the Radio Amateur. The mic amp will be identical to the electret version I build for the SBITX. The transmit LPF will be a W3NQN filter again with the values from the QRP labs LPF kit instructions.
After five years of building I am finally starting to feel like I know enough to do stuff! Thanks Pete and Bill for all the encouragement over the years.
Now that I have the hardware tamed I'm turning my attention to some of the more itnteresting and useful features of the sBitx. With the sBitx software running on a Raspberry Pi 4B there is plenty it is possible to run a variety of digital mode software programs right on the Raspberry Pi itself - there is no need for a separate computer. FT8 is built directly into the sBitx software so there is no need to run WSJTX, but for other digital modes including RTT, FSTK, Olivia, etc. you need to get the Linux versio of those programs and configure them to talk to the sBitx via the Hamlib interface.
This was my first attempt at using Fldigi and I managed to make several good connections with myvfriend Don. KM4UDX. The one pictured above was using the Olivia 16/1K mode. Pretty impressive, but I still have more tuning up to do. While Olivia modes decode flawlessly - I was not able to receive and decode PSK, RTTY, and others. I need to work on getting audio at the correct level to not over-drive the SDR.
I can turn the IF down on the sBitx. I can also make some adjustments to the filtering in the Fldigi softwatre itself.
Victory is at hand. In my previous post I described the Tale of Woe regarding the power and swr meter sensor
As I have suspected for a while the problem turned out to be the some combination of the Arduino board and the Wire library. Rafael Diniz, from the groups.io BITX20 forum suggested I load the ATTinyCore from Spence Konde which I did, but the problem remained - always -1 returned for FWD and REF power. Perusing the Arduino support forum I was pointed to an alternative to the Wire library called TinyWire. I loaded that and changed all the references from Wire to TinyWire and that worked. Here are the details.
Compile, upload and be happy for the rest of the afternoon.
I can't explain why ATtinyCore and Wire worked for Rafael. I never did learn what the original build environment for the SWR bridge was. The comments in the code refer to DIYTiny - I searched and found that one - it didn't work for me either.
The Arduino ecosystem is terrific - unfortunately thre are so many people contributing board managers and libraries - some are great quality - some are marginal - but there is no authoritative place to go to find what works.
Now, finally on to final calibration and packaging!
Walter, KA4KXX and I had an extended QSO yesterday from my QTH in Virginia to his in Florida. And the most remarkable thing is we were both working homebrew version of BITX rigs. I was using my homebrew sBitx and Walter was using his most recent 20 meter SSB and CW rig.
Here are pictures of the two rigs as used on the air!
KA4KXX 20 M SSB CW BITX STYLE
KK4DAS sBitx
Thanks Walter for the fun QSO. A rare pleasure talking with another homebrewer - particularly one who isn't afraid to let his geat go al-fresco!
In other big hombrew sBitx news I completed a clean sweep of the 13 Colonies special event last night - all on SSB working from my garage workshop location wiht my 80M off center fed dipole. I managed to bag the elusive K2K, New Hampshire last night after many tries over many days. So once again the colonies are united and ready to win the war! Fun fact - New Hampshire was the 9th state to ratify the US Constitution making it the official law of the land. So why then were they so reluctant to close the deal with me?
Still waiting for 10 meters to open again so I can check out the peformance on the high bands.
Much progress since the last post. After resolving my ground-bounce and hallucinations with wisdom, I moved on to the transmitter which consisted of a 5 watt power amplifier, straight from the UBITX 40 module. Thanks to Bill, N2CQR for the recommendation and his excellent Manhattan layout.
The three stage PA starts with a 2n3904 pre-driver followed by a 2N2219A driver with a heatsink cap and the fnal is an RD0HHF1 biased at around 6.5V - which puts it squarely in class A. Bill's build and other bias more for class AB which I may experiment with later.
Next I needed a microphone and microphone amplifier. I built the microphone amplifier straight from the SBITX schematic and built a homebrew electret mic.
The homebrew electret capsule in a 3D printed case The PTT is a SPDT microswitch. When I first hooked it up the mic did not seem very sensitive - almost had to shout to see output on the scope. A little googling and noodling and I figured it out. In brief - when I finalized the mic amp build I mistakenly powered it from the 5V rail instead of the 12V rail, that accounted for most of the low output. By then I had read through the long groups.io thread from last year on electret bias and the recent thread on SSB audio quality and had ordered a ag of the -25dB capsules that Gordon recommended. They accept VCC of 2-10 V through a 2.2K resistor. So replaced the R21 10K biase resistor with 2.2K to the 5V rail. With that setup the mic is working great.
With the mic amp and PA done I began work on the LPF module. The module consists of 4 filters covering the 80 meter to 10 meter bands. In the original SBITX it is a diode switched module. I spent some time understanding the diode switching but decided instead to use relays - it takes away a lot of the complexity of the module.
Next lesson learned: when I first built the LPF board I had the relays only on the input and had tied all of the outputs together. This created all kinds of problems with the filters interferring with each other even with their input switched out of the circuit. Solution and best practice is to switch both the inputs and outputs and ground the unselected filters. Problem solved. But not out of the woods - still too much loss in the filter module. I put that asisde for now and moved on to fixing the frequency alignment.
I had previously tried to align the frequency (so that the displayed frequency matches the actual Tx or Rx freqency without success. The alignment is done by creating a compensation offset for the 25MHz clock of the SI5351. Its usually straight forward. Inject a known 10MHz signal into the receiver, zero beat and note the frequency display. The delta between 10MHz and the frequency display can be used to derive the actual crystal value. Pop that into the code and the the transceiver should be aligned. The problem was it was aligned at 10MHz but off at 5 and 20. After much testing and head scratching and with an assist from Farhan himself we discovered the problem was that the MIKROE WM8731 prototype board uses a different clock rate than the Linux driver in the Raspberry Pi. In brief, the driver expects the codec to use the standard USB clock rate of 12MHz but the MIKROE board uses the more standard audio processing frequency of 12.288MHz. The fix is to replace the 12.288MHz crystal on the MIKROE board wiht a 12MHz crystal. Like so:
The surface mount crystal did not come off the board cleanly - in fact it lifed one of the tracks clean off the board. So I put in a field expedient patch - the red enamled wired to replace the damaged trace. To my delight it worked straight away. I used blue painters tape to mask off the adjacent pins and that made the sodering to the chip much easier.
The results is very satisfying - here is the first loggable QSO I had after completing the rig:
I'm very pleased with the way the rig is working. I have a few kinks to iron out but we are appoaching the finish line.
After a long hiatus I am back at the blog. I have a number of projects that I have been working on that I will share going forward, but today I want to talk about my latest project - a homebrew version of the SBITX transceiver designed by Ashhar Farhan. The SBITX is a hybrid analogue superhet transceiver / software defined radio. The analogue portion of my build is based on the Furlough 40 / SimpleSSB that I built in 2020. The SDR software runs on a Raspberry Pi 3 or 4 with software written by Farhan. I'll explain the title of the post before we are done today but first lets take a look at the KK4DAS SBITX.
Here is a demonstration made shortly after I completed the receiver:
For a quick overview of how it works, lets look at the block diagram.
Beginning with the antenna on the upper right let's follow the received signal path. First we pass through a single 30 MHz low pass filter which passes the entire HF band. We amplify the incoming signal with a broad band RF amplifier and then pass it through and ADE-1 mixer to mix the signal up the the 40MHz IF. The LO and BFO clocks are provided by an SI-5351 PLL controlled by the Raspberry Pi. The homebrew 40MHz crystal ladder filter is 25KHz wide which controls how much of the spectrum you can see on the waterfall display at any one time. The bidirectional IF board I am using is the first board I built for the SimpleSSB at the beginning of 2020. I have replaced the 9MHz commercial filter with my homebrew 40MHz filter. The second mixer then drops the signal to a 24Khz IF which is well within the range of the ADC in the codec board. From the second mixer we go through a low noise amplifier to boost the signal and pass it in to the left line-input channel of the codec. The 24KHz signal is digitized in the codec and passed on to the Raspberry Pi where further signal conditioning and filtering occurs, the waterfall display is generated and the digital audio is extracted. The digital audio is sent back to the codec where the digital to analog conversion occurs and the analog signal is sent out the left line output to headphones or to an amplified speaker. The SBITX software also supports FT8, RTTY and CW decoding natively - no additional software or computer is needed. For a detailed description of the SBITX you should read Farhan's SBITX description linked above. Transmit will work much the same but in reverse. I'll cover that when I get the transmitter implemented.
I'm very happy with how the receiver is performing. Its fun to listen to and sounds great. But getting to this point has not been without a few stumbles and sidetracks. I was honored to be included as a guest on the SolderSmoke Podcast Episode #250 with N2CQR, Bill Meara and N6QW, Pete Juliano where I shared my tales of woe - a few of which I will describe here in more detail and a others which I will save for another day.
Ground Bounce - shortly after completing the receiver I made the unsettling discovery that signals that were being transmitted on 20 meters were being received on 20 meters but also at exactly half the frequency on 40 meters. This was not good - it seemed that it had to be strange mixing products in the first mixer, but I had tested the entire IF before hooking it up to the digital board - and this very same IF board was pulled from a working receiver. I looked at the output of both mixers and I couldn't see how the the 20 meter signal was leaking in on 40. After thinking about it for a bit I decided to look at the SI5351 outputs on my TinySA Ultra spectrum analyzer and instead of seeing one clean signal on each of the LO and BFO clocks I saw both signals on both clocks. This was clearly the source of my problem. Skipping over a day or two of troubleshooting I sent a note to Farhan and he immediately identified the problem. It was "ground bounce. Apparently if the clock outputs are not properly grounded it causes current to rise internal the SI-5351 and signals to bleed between the clocks. In following a separate piece of advice from Farhan on buildiing the digital board I had very carefully insured that there was one and only one ground connection in the digital board and that was directly back to the main DC input. I had installed the SI-5351 directly onto the digital board and it shared that common ground. But that meant that I couldn't also ground both ends of the coax shield between the SI-5351 and the mixers. That was the cause of the ground bounce. The solution was to remove the SI-5351 from the digital circuit and put it on the analog circuit - with the only connection between the SI-5351 and the Raspberry Pi were the two I2C control lines. And also to ground the coax connecting the SI-5351 and the mixers at both ends. That fixed it - the ground is no longer bouncing!
Hallucination - after curing the ground bounce I spent an evening listening to the rig enjoying the glow you get after fixing a thorny problem. But my enjoyment was short-lived. I noticed that from time-to-time that the waterfall display would go a little crazy,. It appeared as if the the receive signal was being duplicated all up and down the band somewhere internal to the SBITX. It looked like this:
The signal at the center is the received signal - all of the mirror images are false. Those are the hallucinations. Farhan identified that fairly quickly and let me know about a software fix in the SBITX 3.2 which led me to:
Wisdom - I don’t have a complete understanding, but the hallucinations are artifacts created during the Fast Fourier Transform of the received signal under certain circumstances. The SBITX uses the open-source FFTW (Fastest Fourier Transform in the West) library. There is an extension to the FFTW library called FFTW-Wisdom that is used tune the FFT algorithm the first time it is used. The tuning parameters are saved in what is known as an FFT “Wisdom” file . The Wisdom file, which only has to be computed one time, contains saved information about how to optimally compute Fourier transforms of various sizes. The FFTW Wisdom File man page has more details. That was what was implemented in SBITX V3.2 which eliminated the hallucinations.
I'm still chasing a few problems in the receiver. Top of my list is a tuning problem. When I zero beat WWV on exactly 10 MHz, the displayed frequency on the SBITX is a few hundred Hz off of 10MHz, and when I tune to 15MHz WWV the display is off by a different amount. So, the delta between the displayed frequency and the frequency the radio is receiving changes with frequency – but not in any linear way. I’ve tried several different ways to align the radio but have not yet been successful The last thing I did was disconnect the analog receiver entirely from the SDR and used a signal generator to put a fixed 24KHz signal into the audio codec which should result in a signal displayed dead center on the waterfall – but it did not – it is a few hundred Hz off. the current suspicion is that the crystal on my WM8731 protottype board is out of spec. Farhan has offered to send me one of the codec boards he produced for the early SBITX prototype. When that arrives, I will replace my audio codec with the one he sends. That should resolve this last issue but it still doesn’t explain why the delta moves with HF frequency. That’s what was puzzling me and what I was referring to on the podcast.
I've spent the last few weeks putting the finishing touches on what has become the Furlough 2040 Supercharged SSB transceiver. Originally designed and designated the SimpleSSB by my friend and elmer N6QW Pete Juliano I have extended and supercharged his excellent modular design in a number of ways. The final (although Pete advises you should probably never say 'final' when talking about a hombrew rig) configuration is as follows:
20 Watt SSB and digital dual band transceiver for 20 and 40 meter bands
Arduino Nano Every microcontroller and SI5351 clock generator
9 MHz IF - filter
Nextion Color Touch Screen Display
AGC and S-Meter
3 stage Tx amplifier chain, 2N2219A 1st driver, IRF-510 driver stage generating 1-2 watts driver for the 20-watt push pull RD16HHF1 push-pull final amplifier designed by EI9GQ Ed Skelton
Firmware includes full CAT control for digital modes, frequency scanning, persistent frequency and mode memory stored in EEPROM
Custom enclosure with a CNC cut front panel
KK4DAS Furlough 2040 20-Watt SSB and digital mode transceiver
Walkthrough of the transceiver and the final bench test:
Here is a look at the voice modulation envelope:
And a few more pictures to wrap it up:
Final Bench Test
Final assembly in the enclosure - two levels - Tx board on top
On the air peaking 16 watts SSB phone.
This has been an incredible 2-year learning journey. Many thanks to Pete and also to Bill Meara N2CQR of the SolderSmoke podcast who started out humoring me as I built my Michigan Mighty Mite and have become great friends. Also, many thanks to the members of the Vienna Wireless Society Makers group who joined me on the journey at the beginning of the year and we now have about 15 more SimpleSSB transceivers on the air. Watch this space for more on the VWS maker group progress including KA4CDN, Mike's addition of CW just completed yesterday!
Michigan Mighty Mite - December 2019
73 from Great Falls,
Dean
KK4DAS
UPDATE - For those interested in building a similar rig you should know that this is not a kit nor is there a single master schematic or bill of materials. The vast majority of the components are common resistors, transistors, capacitors, voltage regulators, etc. This is a modular build with each module built and tested and integrated as you go along. Each module is well documented and by virtue of the Vienna Wireless Society Makers group build there is a great set of documentation and examples for each module. Where particular components are required (ADE-1 Mixers, SI-5351 clock module, etc) they are called out in the documentation below.
For builders, I highly recommend you build the original SimpleSSB as specified below. This is a 10 transistor, Arduino controlled 5-watt SSB phone and digital mode rig for 40 meters. Once you have the basic rig built then decide which enhancements are right for you.
QRP is great and by far my favorite way to operate - especially since completing my scratch-built Furlough 20/40 QRP SSB and digital mode transceiver. But as my friend Pete, N6QW says, "some days you just want to put on your big boy shoes." For "big boy shoes" for the Furlough I chose to build the Eamon Skelton, EI9GQ 16 watt power amplifier from his book "Building a Transceiver". The amp uses dual Mitsubishi RD16HHF1 transistors in a push pull configuration. This was my first attempt at anything beyond the SimpleSSB IRF-510 amp that I used in the Furlough. EI9GQ's books is a good reference and there are several other builders who have documented their builds online. Here's mine...
Beginning with the schematic - I used EI9GQ's specification. The transformers gave me pause and I had to really "noodle" over their construction. In addition to figuring out the windings and interconnections, if you read the article EI9GQ recommends torroids and shielded wired that do not seem to be available anymore. For transformer T3 he specifies HEM3011 torroids, I substituted two FT50-43s glued together for each side of the transformer, I also just used #26 AWG for the bifilar turns rather than the shielded audio cable that he recommended.
The next thing to do was to figure out the transformer windings and start to think about layout. Using my primitive graphic arts skills I sketched out each transformer and carefully number the wires. This proved very helpful when it came to construction. Here you can see my layout and tentative parts placement on the top of the heat sink. I made the board about 1/2" longer than the heat sink in both directions to allow for overhang of the SMA connectors I intended to use.
I've been using a CNC mill to carve PCBs for Manhattan style builds for a while and I do my layout in a free program called Carbide Create. It's fairly easy to use and combines the editing package with a G-code generator to produce the program for the CNC mill. Here is my layout.
I always print an an actual size image of the board to check for part fit. This save a lot of time and wasted PCBs if the parts don't fit. For this build I milled the traces for the voltage regulator and bias trimmers, cutout the center square for the transistors and drilled some mounting holes. I decided to wait until construction time to attach Manhattan pads for the components. EI9GQ used mostly u\Ugly construction with all the non-ground connections in the air. I prefer a pad to solder to most of the time but this time I kept my options open. I ended up doing some Ugly construction and some on pads.
Once I was happy with the layout it was time to fire up the mill and get carving. The PCB carve took about 20 minutes. Enough time for a cup of coffee and to contemplate life.
Next up - drilling an tapping holes to attached transistors and PCB to the heat sink. Two trips to the Depot - one for the #6/32 tap and one for the tap handle since my other one didn't clamp down on the small tap.
With the PCB attached to the heat sink it was time to start laying down parts. I started with SMA connectors, transistors and DC bias circuits - leaving the exact placement of the transformers until I had a better feel how everything would go. My only wiring mistake is visible in this next picture. I had soldered the 8 volt regulator in backwards,
I glued down a few hand cut Manhattan pads and soldered up all the components on the input side of the the amp. I attached the input coils. At this point the amp was about 90% complete - I just had to attach T2, the DC wiring for the drains and T3. And also to maker sure I got the transformer connections right.
Amp done and ready for testinng.
And here is a demo of the recreated smoke test. Much to my delight, after correcting the orientation of the voltage regulator that amp worked straight away. With the transistors biased at 500mA each I measured just over 13dB flat across the entire HF amateur radio spectrum,
The next step will be to replace the IRF-510 stage of my Furlough with this amp and see how it works on the air. As I mention at the end of the video I suspect I'll need to add another driver stage to get enough drive for the full 16 watts.
After close to two years of working on projects I'm starting to realize that Pete's adage - "if you know stuff, you can do stuff!" is really true. It has been a steep knowledge climb for me - but I'm starting to feel it.
Just a quick post to share an exciting update on the Vienna Wireless SimpleSSB project. Three member of the VWS held an impromptu 100% SimpleSSB QRP net the other day in preparation for a presentation at our club meeting last night. KA4CDN, Mike. KM4UDX, Don and I had a brief QSO to record or progress for posterity.
After about 6 months of work 16 members of the Vienna Wireless Society Maker's group have successfully completed our 100% scratch built 40 meter SSB QRP receivers and 8 of the group have full up 5 watt SSB and digital mode transceivers. The group has now racked up hundreds of QSOs including many DX to Europe, Central and South America and most US states. With FT8 and other digital modes we have confirmed QSOs from around the globe.
Here are just a few of the finished rigs...
As background - if you've followed my infrequent blog posts you know that the group started a group build of the of N6QW Pete Juliano's SimpleSSB QRP transceiver about 6 months ago. Check it out!
It has been too long since the last update but I have some exciting news and also a classic homebrew “tale of
woe” to share.
First, my friend Mike KD4MM, here in Vienna, VA was the
first member of the Vienna Wireless Society Makers group to complete the
receiver side of N6QW, Pete Juliano's SimpleSSB transceiver – check it out:
Mike shared his progress with us and also this demonstration
of decoding FT8 with simple audio coupling:
And the tale of woe shared by Don, KM4UDX, reminds us that
not everything goes smoothly when building a homebrew transceiver. He
reminds to “Don’t do what Don Did!”
It has been just over a year since I completed my initial build of the Furlough 40 with much coaching and assistance from Pete. Mike and Don are two out of 20 members of the Vienna
Wireless Society Makers group that is working on a group build the SimpleSSB project as enhanced by me to include features like CAT control for
digital modes. Beginning about six weeks
ago the group is progressing module by module per SolderSmoke best practice
advice. We started with the audio amplifier, followed that with the
Arduino/SI-5351 based controller module and the builders are just completing
the IF module. This week at our weekly meeting, Mike proudly showed off
his success.
Pete was gracious enough to provide tribal knowledge and
encouragement to the group a view weeks ago:
The group is generating a ton of great material on the
project including photos and videos of the in-progress builds, technical
documentation, test equipment, procedures and more.
Here just a few pictures of the in-progress builds
Just think of this – in another couple of weeks we may have
as many as a dozen SimpleSSB transceivers on the air…..we are giving serious
competition to the big rigs everywhere.
And a very warm welcoming of to the new members of the much sought after, rarely granted membership in to the International Brotherhood of Electronic Wizards.
The ability to generate a clean sine wave is incredibly useful to the
electronic home-brewer. In testing a an audio or RF circuit you often
need a tune-able, stable frequency source. Commercial ones range from
very expensive, with the ability to generate arbitrary waves at very
precise signal levels. For my purposes a simple sine wave generator
with a variable attenuation meets most of my needs.
This Signal Generator is built using an AD-9850 Direct Digital Synthesizer
and an Arduino Nano. It generates a clean sine wave from 0 to 62.5 MHz
(very clean up to about 50 MHz, but still use-able up to 62.5. There
are various versions of this floating around the internet, including
prebuilt ones from a variety of sellers. The display is
16x2 I2C LCD. The control is a Rotary Digital Encoder with push button.
Turn the encoder
to change frequency. Push the button to select the tuning increment.
There are various versions of this floating around the internet. This is my implementation.
The code and build instructions are available on Github at:
To control the AD-9850 I chose to use a DDS library written by Paul Darlington, M0XPD. You'll need to download it from his Github repository and install it using the Arduino IDE Library Manager. You can read Paul's original blog for details on the library.
DDS Signal Generator Module - any one of the AD9850 boards should work. I used each of these at different times:
Mounting hardware - 4-40 standoffs and spacers, machine screws, washers and nuts
0.1" female headers on the breadboard make it easy to wire the components up in the case
Signal Generator Construction
And here is what the finished product looks like:
KK4DAS Signal Generator
I've been using this in my shop over the last few months to test out circuits on the Furlough-40. It's really useful to be able to inject a known signal at various points in the circuit and see now the downstream amplifiers and filters perform Highly recommended!
At a recent meeting of the Vienna Wireless Society I demonstrated how straightforward it is to build this. I went from a pile of parts to a working unit in under an hour. Here is the video from the meeting: